Tuesday, February 18, 2014

GPS Speedometer

I've updated Droid Dashboard application - it's now named - GPS Speedometer.

GPS Speedometer is a speedometer application that uses the phone's internal GPS module to calculate the current speed and display it with large, easy to read, LCD-like fonts. It will also display the total travel time, the average speed, maximum reached speed, the heading and elevation, a nice compass and forward and lateral accelerations.

Features:
- High accuracy. The speed calculated based on GPS data is more accurate than the one displayed by a car's speedometer
- It supports both imperial and metric units
- 5 predefined color themes available
- It can record your path, speed, distance, and elevation and save them in a KML file (for Google Earth) - just press "Menu", select "Settings" and "Record track".
- It can work in the background, so it can record your movement and speed even while you're talking on the phone.
- It has a "HUD mode": the image will be flipped so when it's reflected by the car's windshield, it will appear normal.

It requires the following permissions:

- WAKE_LOCK in order to prevent the screen from turning off
- ACCESS_FINE_LOCATION (GPS based location) for reading GPS data
- WRITE_EXTERNAL_STORAGE in order to save the KML file
- INTERNET to display ads (FREE version only)

Please note that while I've tested the application on several Android devices, there are way to many different Android devices to guarantee that it will work just fine on all of them, so if you encounter a problem with the application, just drop me an email with your phone model and a short description of your problem; I will do my best to fix it ASAP.

It is available on Google Play, for ~2$:
Android app on Google Play

or for free (with ads):
Android app on Google Play


Some screenshots:


And a video:


Sunday, June 9, 2013

Video Poker

I've released a game - Video Poker. It's available on Google Play in 2 versions - one free, supported by ads and with a limit on the amount of credit which you can request daily (5000), and one paid free of ads and with not limitations.

Video Poker it's a small, simple poker game, with a double up mini-game - you can double your winnings by trying to guess the correct card sequence from a randomly generated card deck. With each correct guess, the pot is doubled; do one mistake and you lose it ;). Of course, you don't have to tell the exact value of the cards, you just have to guess if it's a high card or a low card.

How to play:

Start by adding some credits - press menu button and select "Add Credit". Then, select a bet from "+" and "-" buttons. After you've chosen the desired bet, press "Deal" button to deal some cards. Select which cards you want to keep and press "Draw" button.
If you have a winning hand (at least a pair of Jokers), you'll have the option to either collect the pot, either to play the double up mini game and try to double your winnings.


Double Up mini-game:

After each winning hand, you'll have the option to play this mini game, in which you will try to guess if a card selected from a randomly generated card deck is a high card (9, 10, J, Q, K or A) or a low card (2, 3, 4, 5, 6, 7). 8 is an even card, so you'll win regardless if you chose "HIGH" or "LOW".


Balance:

Every time you request some credits (from "Add Credit" menu), the amount of credits requested is recorded and stored; this info will be used to calculate your "Balance" - the difference between the amount of requested credit and the amount of credit you have won. Good players will have a positive balance; bad players will have a negative one.

Screenshots:


Video Poker Free:


Video Poker:

Any feedback will be greatly appreciated!

Tuesday, January 1, 2013

Droid Dashboard

I've released a new application on Google Play - Droid Dashboard.

Droid Dashboard is a speedometer application that uses the phone's internal GPS module to calculate the current speed and display it with large, easy to read, LCD-like fonts. It will also display the total travel time, the average speed, maximum reached speed, the heading and elevation, a nice compass and forward and lateral accelerations.

Features:
- High accuracy. The speed calculated based on GPS data is more accurate than the one displayed by a car's speedometer
- It supports both imperial and metric units
- 5 predefined color themes available
- It can record your path, speed, distance, and elevation and save them in a KML file (for Google Earth) - just press "Menu", select "Settings" and "Record track".
- It can work in the background, so it can record your movement and speed even while you're talking on the phone.

It requires the following permissions:

- WAKE_LOCK in order to prevent the screen from turning off
- ACCESS_FINE_LOCATION (GPS based location) for reading GPS data
- WRITE_EXTERNAL_STORAGE in order to save the KML file

Please note that while I've tested the application on several Android devices, there are way to many different Android devices to guarantee that it will work just fine on all of them, so if you encounter a problem with the application, just drop me an email with your phone model and a short description of your problem; I will do my best to fix it ASAP.

It is available on Google Play, for ~2$ (a free version will also be available a little bit later):
Android app on Google Play

Some screenshots:

Monday, September 3, 2012

My Budget

I've released a new application on Google Play - an easy to use Budget Manager. I find some other budget managers a little bit to complicated, with to many options, while I think that most people want just a simple tool to track their spending. With that in mind, I've created My Budget (and, as usual, a free version - My Budget Free).

There are 3 views:
- a global one, which will show you the total amount of your expenses, the total amount of income and your balance (the difference between income and expenses) and a pie chart with expenses/income grouped by categories;
- an income view and an expense view, which will show you more detailed info - for each category you can see (and edit) details about a specific payment - date, amount and a short description (same goes for income)
For all these 3 views you can chose to see the global data (i.e. total amount of income/spending since you've start using My Budget) or monthly data (spending/income only for a specific month).

Screenshots:


QR Codes:
My Budget Free

Android app on Google Play


My Budget (paid version)
Android app on Google Play


If you were looking for such app for your Android phone, please install it, rate it, and let me know your opinion about it.

Monday, September 12, 2011

Simple Media Player

Update: I had to change the name from "HitAMP" to Simple Media Player because "AMP" is a registered trademark of Playmedia Systems Inc. and the nice folks from Playmedia Systems Inc. decided that since they own "AMP", "HitAMP" (a single word, not "Hit" and "AMP") cannot be used.

There is one thing which annoys me on all media players for Android which I've tried: creating and managing a playlist is unnecessary complicated. You need to create a playlist, after that browse though the song files, find one which you want in that playlist, long click on it and select Add to playlist, select the playlist and after that browse for another song and so on. What if you want to create a playlist with 100 songs? I find this really complicated and time consuming. And if you organize your music directory like me, with subdirectories for different genres or different artists, and at some point you want to listen just to some artist, what can you do? Same thing: create a playlist, after that browse though the song files, find one which you want in that playlist, long click on it and select Add to playlist, select the playlist and after that browse for another song......

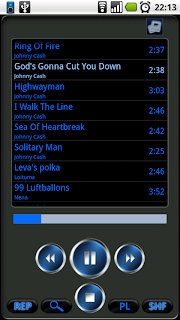
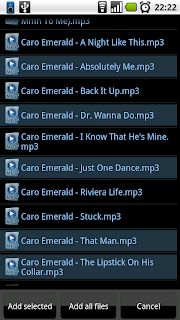
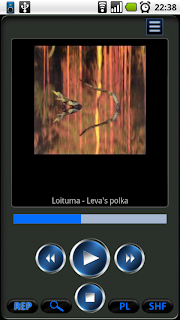
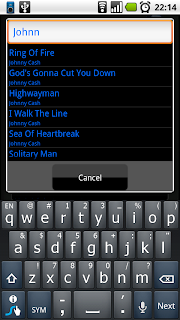
So I've decided to create my own media player for Android, a media player with better playlist management. I'm still using the old PC version of Winamp (2.91) and i really like the simple playlist management. Want to add some media files to the playlist? Just navigate to the location of those files, select them and press a button - all those files will be added to your playlist. You want to add to your playlist all media files in a specific directory? Navigate to that directory and press a button and all the files found in that directory will be added to your playlist. And of course, you can save a playlist, or load previously saved playlists. And that's what I've done with my media player for Android. It's a simple media player which can play mp3, ogg and wav files; it can read ID3 tags; it has all necessary functions (repeat, shuffle, search, save/load playlists) for a media player and nothing more, just to keep it simple and user-friendly. Some screenshots below:


Button functions:
- "REP" buton toggles on and off the repeat function; while repeat is on (REP will be highlighted) HitAMP will skip to the first song in the playlist after it finishes playing the last entry in the playlist.
- Search button (the one with the magnifying glass on it) will open the search window - here you can search for a particular song or artist in the playlist.
- "PL" button will open a small menu from where you can add new files to your playlist, delete it, save it or open another playlist.
- "SHF" button will toggle shuffle on and off. While shuffle is on (SHF will be highlighted) HitAMP will play the songs in a random order.
- on top left part of the interface, above the playlist there is a button which will change from the playlist display to the album art display and vice-versa
- Play/Next/Previous and Stop buttons have the same function as in any other media player.

Simple Media Player is available on Android Market, you can buy it for ~2$. A free version, supported by adds, is also available.

Many thanks to Rhor, which allowed me to use his icons for media files and directories. Many thanks to Jeremy Sallee, who has some nice free icons, one of them ending up as Simple Media Player's icon. Play/Stop/Next/Previous buttons are licensed from psdgraphics.

Friday, June 3, 2011

Pass Safe Gingerbread update

Upgrading to Gingerbread (Android 2.3) will break the Pass Safe's database. In order to avoid losing all your passwords, you should make a backup of your passwords (Export DB function in Pass Safe - unencrypted to make sure that you will be able to read the passwords after upgrade), upgrade to Gingerbread, reinstall Pass Safe and import the passwords (Import DB function in Pass Safe - make sure to use "Import DB (unencrypted)" if you saved the database unencrypted).

And remember, it's always a good idea to make backups before doing any firmware update, no matter how small!

1.5.1 Update:
Pass Safe (even the free version) will dump the database if it will crash after a system update on the sdcard's root directory, in a file named passsafe_crash_db.dump. If you did not create a backup before the system update, you can use this file to recover your passwords. However, you will need an Android phone which was not updated to Gingerbread in order to read these passwords. Follow these steps to recover your database:

1. After update, try to start Pass Safe. It will create a file named passsafe_crash_db.dump on your sdcard's root directory
2. Rename that file passsafe.dump. Warning - it will override any other file named passsafe.dump on your sdcard's root directory.
3. Find another phone which was not updated to Gingerbread (Android 2.3.3) and insert your sdcard (containing newly renamed file - passsafe.dump) into this phone.
4. Install (or update to the last version) Pass Safe Free.
5. Open Pass Safe Free, press menu button and select "Import Database". Caution - do not select "Import DB (unencrypted).
6. Press menu button again and select "Export DB (unencrypted)". Caution - do not select "Export Database".
7. Remove the sdcard and plug it into your phone (the one updated to Gingerbread).
8. Reinstall Pass Safe on your phone.
9. Open Pass Safe, press menu and select "Import DB (unencrypted)". Caution - do not select "Import Database".

Your passwords should be available now.

Wednesday, January 5, 2011

Find Me!

I’ve wrote a new application which can help android users to locate their phone in case it was stolen. With this application, you can setup your phone to send its location upon receiving an SMS which contains a predefined keyword.

After installation, the first thing which has to be done is to setup the application:

Find Me 1 Find Me 2

1. Choose a keyword. When the phone receives an SMS containing only this keyword (please note that it is case sensitive), it will start sending regularly its location to a predefined destination. Or you can even specify the destination inside the SMS – I’ll get back to this.

2. Select a delivery method – SMS or e-mail. If you prefer e-mail, you need a data plan for your phone. If you select SMS, normal SMS rates will apply. Please note that if you select e-mail, you will also receive an attachment – a KML file which can be uploaded into Google Maps or Google Earth; you’ll be able to track the movement of your phone since you’ve started to monitor its location.

3. Select a destination – a phone number, if at previous step you’ve selected SMS, or a e-mail address if you have selected e-mail as a delivery method.

4. Select the update rate. This is the frequency of e-mails or SMS messages with location updates.

5. If you have selected e-mail as delivery method, you have to setup an email account from which the e-mails with your phone location will be sent. You have to input a username and a password (the password will be encrypted, so nobody will be able to extract it). It works only with Google email accounts.

6. Press “Save” button. From now one, you can track your phone by sending an SMS containing the keyword. Your phone will keep sending updates to its location until it receives an SMS containing only “STOP” – case sensitive.

A helpful feature is that you can also control some parameters via SMS. You can specify in the message parameters like the frequency of the updates, delivery method and destination. For this, your SMS should look like this:

<keyword>

Param:<delivery method>:<update rate>:<destination>

where <keyword> is the keyword chosen by you (it’s case sensitive) when you’ve setup the application, <update rate> is the frequency with which the application will send the location, in minutes, delivery method can be either “SMS” or “e-mail” (case sensitive) and the destination is a phone number or an email address. “Param:” is important and it is case sensitive, after this the application expects some parameters. Here is a real life example:

myKeyword Param:e-mail:5:myemail@someemail.com

Note that there is a space only between the keyword and “Param:”