Update: I had to change the name from "HitAMP" to Simple Media Player because "AMP" is a registered trademark of Playmedia Systems Inc. and the nice folks from Playmedia Systems Inc. decided that since they own "AMP", "HitAMP" (a single word, not "Hit" and "AMP") cannot be used.
There is one thing which annoys me on all media players for Android which I've tried: creating and managing a playlist is unnecessary complicated. You need to create a playlist, after that browse though the song files, find one which you want in that playlist, long click on it and select Add to playlist, select the playlist and after that browse for another song and so on. What if you want to create a playlist with 100 songs? I find this really complicated and time consuming. And if you organize your music directory like me, with subdirectories for different genres or different artists, and at some point you want to listen just to some artist, what can you do? Same thing: create a playlist, after that browse though the song files, find one which you want in that playlist, long click on it and select Add to playlist, select the playlist and after that browse for another song......
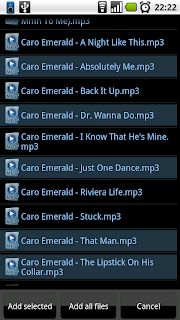
So I've decided to create my own media player for Android, a media player with better playlist management. I'm still using the old PC version of Winamp (2.91) and i really like the simple playlist management. Want to add some media files to the playlist? Just navigate to the location of those files, select them and press a button - all those files will be added to your playlist. You want to add to your playlist all media files in a specific directory? Navigate to that directory and press a button and all the files found in that directory will be added to your playlist. And of course, you can save a playlist, or load previously saved playlists. And that's what I've done with my media player for Android. It's a simple media player which can play mp3, ogg and wav files; it can read ID3 tags; it has all necessary functions (repeat, shuffle, search, save/load playlists) for a media player and nothing more, just to keep it simple and user-friendly. Some screenshots below:

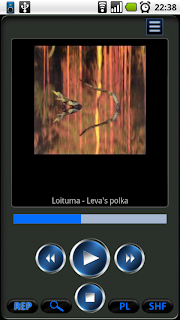
Button functions:
- "REP" buton toggles on and off the repeat function; while repeat is on (REP will be highlighted) HitAMP will skip to the first song in the playlist after it finishes playing the last entry in the playlist.
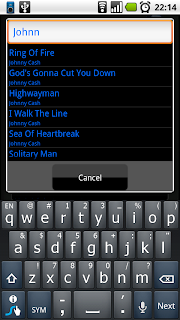
- Search button (the one with the magnifying glass on it) will open the search window - here you can search for a particular song or artist in the playlist.
- "PL" button will open a small menu from where you can add new files to your playlist, delete it, save it or open another playlist.
- "SHF" button will toggle shuffle on and off. While shuffle is on (SHF will be highlighted) HitAMP will play the songs in a random order.
- on top left part of the interface, above the playlist there is a button which will change from the playlist display to the album art display and vice-versa
- Play/Next/Previous and Stop buttons have the same function as in any other media player.
Simple Media Player is available on Android Market, you can buy it for ~2$. A free version, supported by adds, is also available.
Many thanks to Rhor, which allowed me to use his icons for media files and directories. Many thanks to Jeremy Sallee, who has some nice free icons, one of them ending up as Simple Media Player's icon. Play/Stop/Next/Previous buttons are licensed from psdgraphics.
So I've decided to create my own media player for Android, a media player with better playlist management. I'm still using the old PC version of Winamp (2.91) and i really like the simple playlist management. Want to add some media files to the playlist? Just navigate to the location of those files, select them and press a button - all those files will be added to your playlist. You want to add to your playlist all media files in a specific directory? Navigate to that directory and press a button and all the files found in that directory will be added to your playlist. And of course, you can save a playlist, or load previously saved playlists. And that's what I've done with my media player for Android. It's a simple media player which can play mp3, ogg and wav files; it can read ID3 tags; it has all necessary functions (repeat, shuffle, search, save/load playlists) for a media player and nothing more, just to keep it simple and user-friendly. Some screenshots below:


Button functions:
- "REP" buton toggles on and off the repeat function; while repeat is on (REP will be highlighted) HitAMP will skip to the first song in the playlist after it finishes playing the last entry in the playlist.
- Search button (the one with the magnifying glass on it) will open the search window - here you can search for a particular song or artist in the playlist.
- "PL" button will open a small menu from where you can add new files to your playlist, delete it, save it or open another playlist.
- "SHF" button will toggle shuffle on and off. While shuffle is on (SHF will be highlighted) HitAMP will play the songs in a random order.
- on top left part of the interface, above the playlist there is a button which will change from the playlist display to the album art display and vice-versa
- Play/Next/Previous and Stop buttons have the same function as in any other media player.
Simple Media Player is available on Android Market, you can buy it for ~2$. A free version, supported by adds, is also available.
Many thanks to Rhor, which allowed me to use his icons for media files and directories. Many thanks to Jeremy Sallee, who has some nice free icons, one of them ending up as Simple Media Player's icon. Play/Stop/Next/Previous buttons are licensed from psdgraphics.

